Showing posts with label quilt story. Show all posts

Sunday, December 1, 2013

Joys and Trials of Social Media

Hi Everybody! 
I have been having difficulty gaining access to this blog account when I have felt the urge to write lately.  I made it through today though!  It has been a busy fall here in Colorado.  The flood was not a good time for anyone I know.  There has been a lot of clean up and things are getting back to normal.  That's the great thing about us resourceful mountain folk.

 If you look back through my posts, you might find the Empress Ohashi quilt that I did for a client last winter.  She was being stored in a closet waiting to see if she was going to MQX West when disaster struck.  I found out the closet was leaking with all the rain and the original red interlocking design in these center corners was bleeding into the beige!!!!!  After many deep breaths, I realized that I made the quilt, I could fix the quilt.  I ripped out the offending, bleeding red fabrics and came up with this new design to cover all the damaged areas.  It was a good deal of work getting her ready and off to the show.  It is so much fun to have a quilt in a show that your parents went to see!

                                                                                  
Empress Ohashi's new corner treatment
Now that the Thanksgiving feasting is done (I will never be finished being thankful), I can focus on getting through the next holiday.  I have the Quilts for Paws program, several quilts and my wonderful truffles up for sale at www.mountainjoyquiltndye.etsy.com.  Time to think of gifts of folks that I love.  I will share all the photos of the Christmas gift quilts, both clients and personal, after the holidays.  I hate ruining surprises. 
Until next time, keep quilting and creating!

Monday, September 17, 2012

It took quite a while for me to get these personal quilts done, but perseverance pays off.  I love my bedroom now.  Here is a photo of the quilt made from our wedding Huppah and the signature quilt of wedding guests on the wall.  The quilt has my favorite design, The Seed of Life.  I went very simple with my quilt, it does not have any bias tape on it.  I usually make the seed look stained glass with black bias tape and then I have been known to lay down miles of colored bias tapes in Celtic knot work around the borders.  (Visit my website gallery to view several versions of this great design, www.mountainjoyquilts.com). 
I had a very busy weekend with the 1st Annual Gilpin County Artist Open Studio Tour.  I had over 30 people come visit my studio which is really good considering how far from the beaten track I live.  Everyone was just delightful.  They loved my work, my long arm, and my funky mountain home.  It was a great experience for me and I loved meeting all the new people. 
Looks like rain today or possibly our first snow?  I must get to work now, I have a queen size quilt to do today.  I hope everyone has a fabulous week!  Keep on creating!

Friday, May 25, 2012

Wedding Memory Quilts

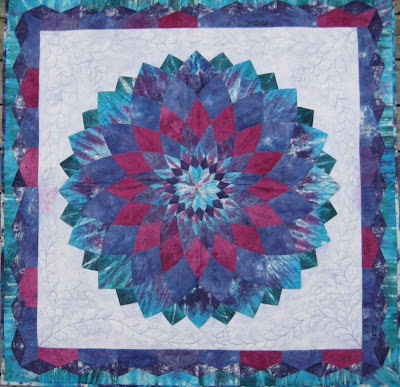
I got married to my tie-dyeing husband 5 years ago.  As mentioned in earlier blogs, the whole wedding was tie-dyed including my dress and the Huppah.  It only took me these 5 years to finish because I'm always doing projects for others.  This is the first time my mom gets see this quilt finished.  She painstakingly pieced this dahlia quilt for me of the fabrics we had people sign with their well-wishes.  Along with the usual love & joy, some of the wishes were fabulously funny such as "If this quilt is a rockin', don't come a knockin'."
This quilt was no different than any of my other learning experiences with quilting even though I didn't piece it.  I have done signature quilts before and one was a great family tree that used fusible applique.  During that quilt, I learned it was better to attach fusible to the back of fabric before people signed it (the fabric doesn't wiggle and you don't have to use sandpaper).  So, I talked my mom into doing this for our quilt.  She didn't know that she was going to choose a Dahlia pattern.  For anyone who is thinking of doing this---Never, Ever fuse the back of fabric if you are going to make a Dahlia!  Mom did a great job and it actually quilted and lays pretty flat for all the stiff bulk that went into the seams.  This quilt will soon be hanging over our bed and the finished Huppah quilt will be on our bed.  Our room will look so nice if I ever get around to arranging it!  Photos to come in the future (near or far).
I was visiting the Quilters Blogging site this morning and found it was updated.  Michelle is doing some amazing work trying to keep all of us quilters connected and informed.  She has put out an invitation for more quilt bloggers to join the directory.  If you are not aware of this site and directory yet, you should really go check it out.  I'm setting up a link so you can get there quickly and start reading about quilters and their experiences world-wide.

Sunday, April 22, 2012

Quilt of the Week

This is a close-up of the one of the center motifs I quilted into this weeks quilt of the week.  I had so much fun working on this quilt, I used almost every technique that I know.  This client loves my freehand quilting, in fact she thinks it would be a shame if I went computerized!
 I choose to go with many custom designs to compliment each of the sampler designs.
 Shown in the close-up is one of my original Celtic knotwork designs that I quilted using my laser followed by free motion fill-in.  I used the follow-the-laser then free motion fill in for a complex pinwheel block throughout the quilt as well.
In other areas, I did free motion pinwheels and feathers.  The border is all free motion using my Leaf & Scroll design.  For the gridwork in the checkered spot, I pulled out my acrylic rulers so I get them nice and straight.
It is great to know a lot of different quilting techniques and designs to employ in the quilts I do.
 I always try to do justice to the quilt.  That means listening to what it wants to look like and following through.  In this quilts case, I could easily have done an all over pattern.  Instead, I had to listen to the quilt tell me every block was special and worth the custom quilting and tucking of few thousand threads. (Yes, thousands!)
It was worth it though as I am proud of the quilting (difficult for this perfectionist).  It will be picked up soon and I hope the client likes it too.  That is always one of my heart-wrenching fears is that my client won't like what I've done.  The people that seek me out truly love my quilting, I fear it is my blood to be a worry-wort.
Okay, I have to go make cinnamon rolls now for the blacksmiths that will be showing soon!
Keep quilting and cooking!

Sunday, March 13, 2011

The Silk Tie Quilt Project


Do you see all these beautiful silk ties? I am
in the process of turning them into something that will resemble the antique quilt also pictured. This project was recently begun for a dear friend of the family. This friend wanted a traditional quilt pattern so I pulled out my copy of Vintage Quilts by Bobbie Aug, Sharon Newman, and Gerald Roy. I found this most exquisite Log Cabin Barn Raising from 1860 made by Florence Mae Hart Diehl. I just fell in love with the color ways she used. In the next few weeks, I will show photos and share the progress. I want to get it done quick because I get to go back to Long's Gardens and play in the dirt and smell iris soon.
It's been quite a week of progress for the quilt and my husband in the quilt world. We started by having to arrange the ties in appropriate color ways. I put Sid to work on that part, because he truly is my color guy. He started putting them in groups all over my long arm. A couple of hours in, I noticed he might not realize what we were trying to achieve. I continued explaining and he kept rearranging the ties. After about four hours, we were ready to kill each other. So we put it away for the day.
Second day of working on it, we begin in same (wrong) direction. I finally gave him all the books on how to piece a log cabin block, the photo above, any math I'd managed and sent him to his room. About a half hour passed and he started coming downstairs every few minutes to ask a very pertinent question or two. Then he'd go back upstairs to study and think. He finally came down and I could actually see the light bulb shining above his head. He actually got it, he figured out what I needed him to do. Ties were flying in all directions as he arranged them in wonderful groups of colors. When he was done, I realized that now it was my turn.
Well, Day 1 was only 6 days ago. I have already completed 28 of the 100 blocks. And I must it is coming out gorgeous! The next time we have the blocks laid out, I'll take photo for you all to see. We could vote on favorite variations of the settings.